|
 |
|
| |
|
how
to adjust the margins and guide lines of the tree
menu |
|
| |
|
|
|
| 0. |
|
 |
|
| |
|
|
|
| 1. |
|
Demo: Omega Xtree
File Name: VLines_01.png
Folder: images
You can adjust the slice area for these horizontal
and vertical lines so that there is more white
space vertically and/or horizontally. This will
create exactly the amount of white space you desire
as well as position your menu item relative to
the menu as well as to any horizontal guide lines
or icons.
If you have menu items that are spread over 2 lines,
that is, a multiple line text menu item, you can
create additional images to account for those types
of menu items and their associated margins.
You can also adjust the width of the horizontal
line itself as well as the thickness and color
You should create new copies and names to reflect
this new image and also add these to new library
items. That way, you can simply change a single
library item to make a change. |
|
| |
|
|
|
| |
|
|
|
| 2. |
|
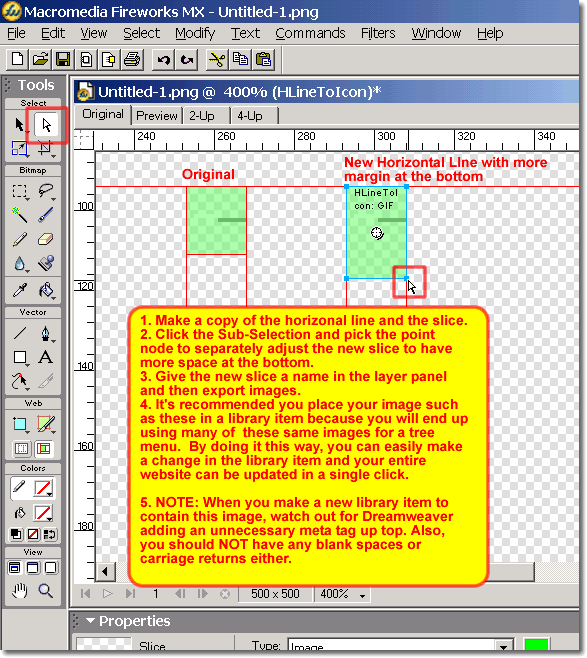
CLOSE UP VIEW OF NEW HORIZONAL LINE FOR TREE MENU
|
|
| |
|
 |
|
| |
|
|
|
| |
|
1. Make a copy of the horizonal line and the slice.
2. Click the Sub-Selection and pick the point node
to separately adjust the new slice to have more
space at the bottom.
3. Give the new slice a name in the layer panel
and then export images.
4. It's recommended you place your image such as
these in a library item because you will end up
using many of these same images for a tree menu.
By doing it this way, you can easily make a change
in the library item and your entire website can
be updated in a single click.
5. NOTE: When you make a new library item to contain
this image, watch out for Dreamweaver adding an
unnecessary meta tag up top. Also, you should NOT
have any blank spaces or carriage returns either.
|
|
| |
|
|
|
|
